User:Mindraker/CFrame
Introduction
This page will introduce you to the basics of using CFrame.
CFrame
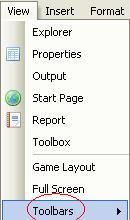
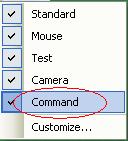
CFrame stands for Character Frame (Coordinate Frame if you want the true name). With CFrame, an object's position, which way it is facing, and its rotation can be changed. The difference between teleporting things via Vector3 and CFrame is that CFrame takes anything welded to the object along with it. Say you want to teleport yourself to the coordinates 0,10,0. First, make sure the Command bar is visible, which is activated from the View menu:
The following command, which can be entered in the Command bar or as part of a script, is a Vector3 example to teleport your Torso to the coordinates (0,10,0):
game.Workspace.username.Torso.Position = Vector3.new(0,10,0)
Similarly, here is a CFrame example to teleport your whole body to the coordinates (0,10,0):
game.Workspace.username.Torso.CFrame = CFrame.new(Vector3.new(0,10,0))
Notice when you use Vector3 alone, only your torso gets moved, but the rest of your body (head, legs, arms) remains in place. When you use CFrame combined with Vector3, your whole character gets transferred. Why use Vector3 in a CFrame? In this situation, the CFrame is looking for the x, y, and z coordinates. If you read the Vector3 segment, you would know what each vector is.
Use of variables
A simpler way is to use a variable to represent oneself, instead of typing the long string:
myself = game.Workspace.username -- change "username" to your own name
myself.Torso.CFrame = CFrame.new(Vector3.new(0,10,0))
First is the variable noting myself. I go to myself and choose my Torso because the torso holds all the welds and snaps, and it is the main component of the character's frame. Instead of using ".Position", I use "CFrame". I am not changing its position anymore, I'm changing its whole frame. There is the "CFrame.new" statement, now inside the parentheses are the three vectors, x, y, and z.
Slopes
Make a brick, anchor it and name it "slope" (this name is only being used for this tutorial, you can choose your own). Then open the Command Bar and type this in:
game.Workspace.slope.CFrame=CFrame.fromEulerAnglesXYZ(0,0,0) -- if you change the name of the brick, change "slope"
Change the "(0,0,0)" to how many radians (not degrees) you want the brick to rotate. Instead of using degrees, they use radians, which are a different way of saying how big an angle is. You can use numbers between 1 and 0, which will work fine.
You can put the new number in any one of the three zeros in the line, like this:
game.Workspace.slope.CFrame=CFrame.fromEulerAnglesXYZ(0.5,0.9,0.3)
Which will make it rotate in three different dimensions at once. You can also press enter a couple of times and it will make the brick rotate again, so you can rotate it farther.
Also, you can use
brick.CFrame=CFrame.new(Vector3.new(0,100,0)) * CFrame.fromAxisAngle(Vector3.new(0,0,1), math.pi/2)
- Change the first CFrame.new(Vector3.new((x,y,z)) values to reflect the position of your brick.
- Change the second CFrame.fromAxisAngle(Vector3.new(x,y,z)) values to reflect which dimensions you are rotating. For example, if you want to rotate the brick around the z axis, use (Vector3.new(0,0,1)). If you want to rotate the brick around the y axis, use (Vector3.new(0,1,0)). If you want to rotate the brick around the x and z axis, use (Vector3.new(1,0,1)).
- Lastly, change math.pi/2 to the value in radians you wish to angle the brick by. This can be a constant (for example, a number), or a variable (for example, x).

