How to use Dialog

|
Outdated Page This article has outdated information. Please update this page to fit our current standards! Specifically: Remove or rewrite the first sentence. |
Introduction
ROBLOX released a new object called Dialog. Dialog is an object that lets you have NPC characters that you can talk with, using a built in interface. It's very easy to use, and doesn't even require scripting. However, you can add extra functionality with the scripting event DialogChoiceSelected.
What can I do with Dialog?
You can use it to:
- Create NPC quest characters that reward you, or give you quests.
- Create help bots.
- Make talking enemies
- Plenty more, just use your imagination!
How to use Dialog
Basic Overview

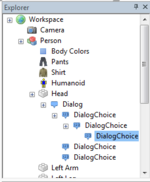
Dialog is actually very easy to use, with no scripting necessary for those of you who aren't accomplished in Lua. It works like this:
Dialog
	DialogChoice
		DialogChoice
		DialogChoice
	DialogChoice
		DialogChoice
		DialogChoice
The Dialog object displays the initial prompt, which then gives the user the choice of replies from the DialogChoice objects. The DialogChoice then gives the user the choice of replies from the DialogChoice objects inside itself.
Creating a basic Dialog
Making the speech bubble
Firstly, open ROBLOX Studio and create a new place. In explorer (view -> explorer),select the part you want the speech bubble to appear above. Click Insert, select Object and in the window that appears select 'Dialog'. There's your initial dialog object created! You won't be able to see a speech bubble appear until you run the game with a character in (online or test solo). In the properties window (view -> properties), you will see the 'InitialPrompt' property. Change this to what you want the part to say as soon as you click on the speech bubble.
Hooray! You've got your first part to speak when you click on its icon!
Adding choices
So, hopefully you've got your speech bubble. That's great and all that, but you can't talk to it, can you? Select the original Dialog object and click Insert, then Object, and from the window select 'DialogChoice'. In the properties window that you should have open, you will see a property called 'UserDialog'. This is the choice that the user will be given, not the name of it or any other properties. The property 'ResponseDialog' is what the part will say when the user selects that option, change it to what you want that to be. You can add as many DialogChoice objects to the original Dialog object to give the user that amount of choices.
Adding more choices
Our Dialog now has several choices from the user to choose from, which result in the part giving a response. Additionally, we can add choices to those choices, creating a larger conversation with the part. To do this, all you need to do is complete the previous step but instead of inserting DialogChoice objects into the original Dialog object, you insert them into an existing DialogChoice objects.
More properties and customisation
You can customise your Dialog further with additional properties. Change these with the properties window. Note: These are only the properties that will have a visible effect in game.
ConversationDistance (Property): Set this to the maximum distance you can talk to the part from. If you start within the distance then walk out of it, the conversation will end.
Purpose (Property): These are the different icons that appear above the part for you to click on. 'Quest' is an '!', 'Help' is a '?' and 'Shop' is a '$'.
Tone (Property): This is the color of the conversation - the speech bubble, and the choice GUI. 'Friendly' is green, 'Neutral' is blue and 'Enemy' is red.
Scripting
If you're accomplished with Roblox Lua, you can add even more functionality to your NPC part. The scripting event DialogChoiceSelected holds two arguments - the player object and the object of the choice the player selects. It does not return the name of the choice. It fires whenever the player selects a choice.
workspace.Dialog.DialogChoiceSelected:connect(function(player,choice)
	print(player.Name,choice.Name)
end)
That would print the name of the player and the name of the choice selected whenever the player selects a choice. You can't localise it to a specific choice with the Dialog methods. If you want to make something happen whenever a player selects a specific choice, you need to give it a unique Name property and compare it with an if statement.
workspace.Dialog.DialogChoiceSelected:connect(function(player,choice)
	if choice.Name == "No" then
		player.Character.Humanoid.Health= 0
	elseif choice.Name == "Yes" then
		player.Character.Humanoid.Health = 1000
	end
end)
You can make something happen whenever a certain player selects a certain choice as well.
Example:
workspace.Dialog.DialogChoiceSelected:connect(function(player,choice)
	if choice.Name == "isplayer" and player.Name == "pighead10" then
		player.Character.Humanoid.Health = 10000
	end
end)
With this event, you can give characters quests, rewards, shop items and more!