How to make a car
Introduction
This tutorial will demonstrate the basic steps needed to create a car from scratch. It will also describe how to add additional features to the car. The scripts used to make the car move are derived from the basic plane scripts. In that sense, the car has many of the same key objects as the plane. For this tutorial, the plane scripts have been simplified and customized to make the car-specific.
Creating a Car From Scratch
These instructions describe the building of the car within Roblox Studio.
The car will consist of these models:
- CarGarage
- Car
- Parts
- BodyKit
Creating the CarGarage Model
The purpose of CarGarage model is basically to hold the script needed to re-generate the car after a player drives away. Follow these steps to create the CarGarage model and add the necessary objects which will allow the car to regenerate.
- In the Explorer window, select the Workspace
- From the Insert menu, select Object > Model
- Rename this new model CarGarage
- Select the new CarGarage model
- From the Insert menu, select Object > IntValue. Rename this value Regen
- Select the CarGarage model, and insert a Script object. Rename this script RegenScript. Add the following code into the script.
system = script.Parent     -- gets the Garage model
model = system.Car         -- gets the Car model
backup = model:Clone()     -- creates a copy of the Car model
regen = system.Regen       -- Saves the integer value stored in the Garage's Regen variable

function checkRegen()
	if regen.Value == 1 then          -- When the player starts driving the car, the script
					     -- sets this value to 1
		model = backup:Clone()    -- copies the copy of the Car
		model.Parent = system     -- adds the plane to the Garage
		model:MakeJoints()
	end
end

regen.Changed:connect(checkRegen)         -- When a Car is created, the regen value changes
                                          -- from nil to a value - triggering this call.
Creating the Car Model
The Car Model will hold all parts that are needed to make the car. Follow these steps to create the structure of the Car:
- Select the CarGarage Model and insert an object Model. Name this new model Car.
- Select the Car model, and insert an object IntValue. Name this value Stunt.
- Insert into the Car model two additional models - name them Parts and BodyKit.
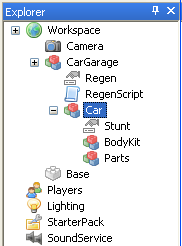
- The structure of the CarGarage model should now look like this:
Creating the Parts Model
This model will hold all the key pieces that will make the car driveable. Follow these steps to add the necessary pieces:
- Select the Parts model and insert a CFrameValue object. Name this value OriginCFrame.
- Insert into the Parts model a script object. Name this script CarScript.
- Insert into the Parts model a Seat object. Note, this seat will be the driver's seat.
- Change the Size of the seat to be 2x2 (2 for x axis, and 2 for z axis.)
- Change the formFactor of the seat to be Plate.
- Change the BrickColor property to any color. In this example, the seat is Black.
- Change the FrontSurface property of the Seat to Hinge. This will show which side of the Seat is the front. It is important that the front of the Seat brick is facing the front of the car. The FrontSurface can be changed back to Smooth.
- Change the BottomSurface and TopSurface to Weld.
- Insert into the Parts model a Part object. Name it Engine.
- Change the Size of the Engine brick to be x=2, y=1.2, z=16. For this example, this brick will make the bottom of the car.
- Change the BrickColor property to any color. In this example, the Engine brick is Bright red.
- Change the FrontSurface property of the brick to Hinge. This will show which side of the brick is the front. It is important that the front of the Engine brick is facing the front of the car. The FrontSurface can be changed back to Smooth.
- Insert into the Parts model an additional 4 Part objects. These bricks will become the wheels of the car. Name the 4 new bricks these names:
LeftWheel1, LeftWheel2, RightWheel1, RightWheel2. For each of these 4 wheel bricks, do the following:
- Make the BackSurface, BottomSurface, FrontSurface Smooth
- Make the size (3,3,3)
- Make the Shape property Cylinder.
- Make the formFactor property Symmetric.
Creating the BodyKit Model
s

