User:Buckethead101/Tools and HopperBins
Introduction
What's a battle place without the weapons? What's a plane without the plane tool? What's a buildng place without any building tools? The answer to all those, is nothing. In this tutorial, you will learn to make some basic tools and weapons.
Intro to HopperBins
The easiest and most basic tool is a hopperbin. A hopperbin is a tool where you don't hold anything; your arm doesn't even come up. That's what plane and car tools are. It's what reset tools are. It's what (some) rock-trowing tools are. Hopperbins are used for many things.
The Basic Functions
The basic functions for hopperins are:
- Button1Down - Makes something happen when you click.
- KeyDown - Makes something happen when you push a key on the keyboard.
- Selected - Makes something happen when the tool is selected
- Deselected - Makes something happen when the tool is deselected.
Making a Reset Tool
Getting Started
Now that you know the basic functions, it's time to make a reset tool.
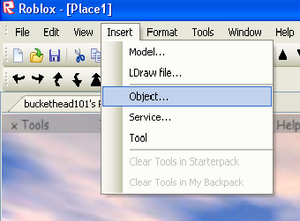
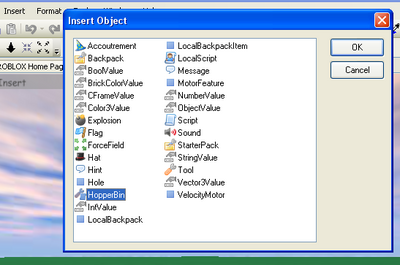
First Thhings first; In the explorer menu, select the starterpack in explorer, and go to Insert>Object.
Next, double-click on HopperBin.
Now, rename the hopperbin to "reset", select it, and go to Insert>Object again, but this time double-click on Script. Now, double-click the new script. It should say "print("Hello world!")" Delete that.
Making the Script
Now it's time to make the script. You will learn how to use the functions listed above.
First is the Button1Down function.
function onButton1Down(mouse)
Next we need to say what happens when the player clicks.
script.Parent.Parent.Parent.Character.Humanoid.Health = 0 -- kills the player
end
Now we ned to do the Selected function.
function onSelected(mouse)
mouse.Button1Down:connect(onButton1Down) -- the connection line for the Button1Down function
end
Finally, we need the connection for the Selected function.
script.Parent.Selected:connect(onSelected)
The Finished Script
function onButton1Down(mouse)
script.Parent.Parent.Parent.Character.Humanoid.Health = 0 -- kills the player
end

function onSelected(mouse)
mouse.Button1Down:connect(onButton1Down) -- the connection line for the Button1Down function
end

script.Parent.Selected:connect(onSelected)
Intro to Tools
A Tool is a tool where you do hold something in your hand. This is call the handle.
Using Handles
Go to Insert>Object again, and click Tool. Now, select the tool, and go to Insert>Object, and click Script. Now select the tool again, and go to Insert>Object again, and click Part. Now, name the new part Handle. Spelling and capitalization must be correct. Finally, select Handle and using it's properties, make it look how you want.
Making the Tool
Now that you have a tool with a handle, we're going to make the tool do something. To keep it simple, we'll just make a tool that disapears for a few seconds when you click.
First things first- Tagging the player and the tool.
tool = script.Parent -- tagging the tool.
player = tool.Parent -- When tools are selected, they become a child of the character
                     -- Instead of the player.
Now, the function. Tools use the Activated function.
function onActivated()
Now, we need to make it disapear.
tool.Parent = nil
wait(3)
tool.Parent = player
Finally. let's end the function and write the connection line.
end

script.Parent.Activated:connect(onActivated)
The finished script
tool = script.Parent -- tagging the tool.
player = tool.Parent -- When tools are selected, they become a child of the character
                     -- Instead of the player.
function onActivated()
tool.Parent = nil
wait(3)
tool.Parent = player
end

script.Parent.Activated:connect(onActivated)
When I went to test this, for some odd reason it just closed roblox. So there you go- a roblox-closer!

