Adding and Removing Tools in Your Place: Difference between revisions
From Legacy Roblox Wiki
Jump to navigationJump to search
No edit summary |
Starter pack itself is still functional |
||
| Line 1: | Line 1: | ||
{{CatUp|FAQ}}{{Outdated|reason=The | {{CatUp|FAQ}}{{Outdated|reason=The toolbox is no longer functional, but this page could be rewritten to provide alternative methods of importing tools such as a link to UBlox.xyz}} | ||
== Introduction == | == Introduction == | ||
Latest revision as of 15:02, 12 November 2023

|
Outdated Page This article has outdated information. Please update this page to fit our current standards! Specifically: The toolbox is no longer functional, but this page could be rewritten to provide alternative methods of importing tools such as a link to UBlox.xyz |
Introduction
This article teaches you how to add and remove tools from your place.
Adding Tools to Your Place
Tools are items that are usable by Roblox characters. They include weapons mainly for battling other players. Adding tools to your map is easy. Just open your place in edit mode or solo mode, and follow these steps:
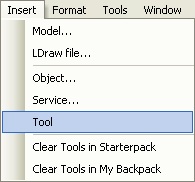
- 1. Go to Insert, then Tool.
- 4. In the menu that pops up, click on a tool you would like to insert into your place.
- 5. Decide whether you want to put the tool into either the Workspace or the StarterPack.
- If you insert a tool into the StarterPack, this means that players will get this tool when they enter your place. If you insert the tool into the Workspace, it will lie on the ground until someone picks it up.
Don't forget to save your place once you have finished!
Removing Tools From Your Place
Removing tools from your place is just as easy as adding them. To start, make sure you have opened your place in edit mode or solo mode.
To remove tools from your StarterPack,
- Go to Insert, then Clear Tools in Starterpack.
- Keep in mind that your are removing your tools from your place, and you may not be able to get them back!
Don't forget to save your place once you have finished!

