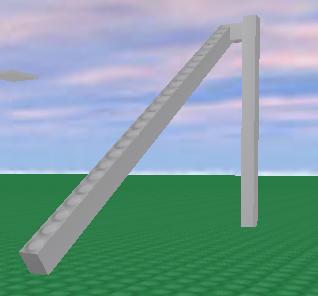
How to Make Ramps: Difference between revisions
>Mr Forums |
>Outofspace |
||
| Line 2: | Line 2: | ||
__TOC__ | __TOC__ | ||
== Introduction == | == Introduction == | ||
There are two ways you can make ramps. You can either use a Hinge or a CFrame to edit rotation | There are two ways you can make ramps. You can either use a Hinge or a CFrame to edit rotation. | ||
<!----------------------------------------------------------------------------------- | <!----------------------------------------------------------------------------------- | ||
If you're editing this to post about the Wedge, you'd better not waste your time. A Wedge is NOT a ramp, it's still a square brick. These are ramps that make real ramps, a wedge does not do that. I've already warned that the next one to post about a wedge gets a ban. So don't do it. --------------------------------------------------------------------------------> | If you're editing this to post about the Wedge, you'd better not waste your time. A Wedge is NOT a ramp, it's still a square brick. These are ramps that make real ramps, a wedge does not do that. I've already warned that the next one to post about a wedge gets a ban. So don't do it. --------------------------------------------------------------------------------> | ||
Revision as of 08:30, 6 November 2008
Introduction
There are two ways you can make ramps. You can either use a Hinge or a CFrame to edit rotation.
Using a Hinge
- In Roblox studio, click Workspace.
- Click Insert > Object > Part
- Resize the newly brick so that it is one unit wide, one unit long, and as tall as you want.
- Click the Weld option in your Toolbar (it has an X in a square).
- Click ONE side of your tall brick with the weld option.
- Click Workspace.
- Click Insert > Object > Part
- Resize this newly created brick so it is one unit wide, one unit long, and one unit tall.
- Click the Weld option in your Toolbar.
- Click the side of this brick that is facing the welded side of the TALL brick with the weld option. You should have two welded faces facing each other.
- Select the Drag option in your Toolbar.
- Place the small brick near the top of the tall tower.
- Select the Hinge option on your Toolbar
- Click the small brick. A yellow dot should be protruding from it.
- Click Workspace.
- Click Insert > Object > Part
- Resize this newly created brick to a long, flat, rectangle.
- Drag this newly created rectangle so that you can't see the yellow dot.
- Test your game. If you did this correctly, your bar should fall downwards.
Using a CFrame
Make a brick, anchor it and name it "slope". Then open the Command Bar and type this in:
game.Workspace.slope.CFrame=CFrame.fromEulerAnglesXYZ(0,0,0)
Change the "(0,0,0)" to how many radians (not degrees) you want it to rotate. Instead of using degrees, they use radians, which are a different way of saying how big an angle is. You can use numbers between 1 and 0, which will work fine.
Play around with it, you can put the new number in either one of the three zeroes in the line, like this:
game.Workspace.slope.CFrame=CFrame.fromEulerAnglesXYZ(0.5,0.9,0.3)
Which will make it rotate in all kinds of directions. You can also press enter a couple of times and it will make the brick rotate again, so you can rotate it farther.
Also, you can use
brick.CFrame=CFrame.new(Vector3.new(0,100,0)) * CFrame.fromAxisAngle(Vector3.new(0,0,1), math.pi/2)
- Change the first CFrame.new(Vector3.new((x,y,z)) values to reflect the position of your brick.
- Change the second CFrame.fromAxisAngle(Vector3.new(x,y,z)) values to reflect which dimensions you are rotating. For example, if you want to rotate the brick around the z axis, use (Vector3.new(0,0,1)). If you want to rotate the brick around the y axis, use (Vector3.new(0,1,0)). If you want to rotate the brick around the x and z axis, use (Vector3.new(1,0,1)).
- Lastly, change math.pi/2 to the value in radians you wish to angle the brick by. This can be a constant, a variable, up to you.
Tips
Try math.pi, its equal to 180 degrees. Then, try multiplying or dividing it to get different angles.
