How to Make Ramps: Difference between revisions
From Legacy Roblox Wiki
Jump to navigationJump to search
>Mindraker |
m Text replacement - "<SyntaxHighlight code="lua">" to "<syntaxhighlight lang="lua">" |
||
| (56 intermediate revisions by 15 users not shown) | |||
| Line 1: | Line 1: | ||
There are | {{CatUp|Tutorials}} | ||
{{LowQualityMedia|reason=The hinge method should be reproduced (in 2008) to get a better screenshot of the end result.}} | |||
{{LacksMedia|reason=The Hinge method is a very dense bullet list, there should be more images along the way.}} | |||
__TOC__ | |||
== Introduction == | |||
There are three ways you can make ramps. You can either use a Hinge or a CFrame to edit rotation, or you can simply insert a WedgePart | |||
<!----------------------------------------------------------------------------------- | <!----------------------------------------------------------------------------------- | ||
If you're editing this to post about the Wedge, you'd better not waste your time. A Wedge is NOT a ramp, it's still a square brick. These are ramps that make real ramps, a wedge does not do that. I've already warned that the next one to post about a wedge gets a ban. So don't do it. --------------------------------------------------------------------------------> | If you're editing this to post about the Wedge, you'd better not waste your time. A Wedge is NOT a ramp, it's still a square brick. These are ramps that make real ramps, a wedge does not do that. I've already warned that the next one to post about a wedge gets a ban. So don't do it. --------------------------------------------------------------------------------> | ||
==Using a Hinge== | ==Using a Hinge== | ||
* In [[Roblox Studio|Roblox studio]], click Workspace. | |||
* Click Insert > Object > Part | |||
* [[Resize]] the newly brick so that it is one unit wide, one unit long, and as tall as you want. | |||
* Click the [[Weld]] option in your [[Toolbar]] (it has an X in a square). | |||
* Click ONE side of your tall brick with the weld option. | |||
* Click Workspace. | |||
* Click Insert > Object > Part | |||
* [[Resize]] this newly created brick so it is one unit wide, one unit long, and one unit tall. | |||
* Click the [[Weld]] option in your [[Toolbar]]. | |||
* Click the side of this brick that is facing the welded side of the TALL brick with the weld option. You should have two welded faces facing each other. | |||
* Select the [[Drag]] option in your [[Toolbar]]. | |||
* Place the small brick near the top of the tall tower. | |||
* Select the [[Hinge]] option on your [[Toolbar]] | |||
* Click the small brick. A yellow dot should be protruding from it. | |||
* Click Workspace. | |||
* Click Insert > Object > Part | |||
* [[Resize]] this newly created brick to a long, flat, rectangle. | |||
* [[Drag]] this newly created rectangle so that you can't see the yellow dot. | |||
* Test your game. If you did this correctly, your bar should fall downwards. | |||
[[Image:Ramp.JPG]] | |||
==Using a CFrame== | ==Using a CFrame== | ||
Make a brick, anchor it and name it "slope". Then open the Command | Make a brick, anchor it and name it "slope". Then open the [[Scripting#Fundamentals|Command Bar]] and type this in: | ||
< | <syntaxhighlight lang="lua"> | ||
game.Workspace.slope.CFrame=CFrame. | s = game.Workspace.slope; s.CFrame = CFrame.Angles(0,0,0) + s.CFrame.p | ||
</ | </syntaxhighlight> | ||
Change the "(0,0,0)" to how many [http://en.wikipedia.org/wiki/Radian radians] (not degrees) you want it to rotate. Instead of using [http://en.wikipedia.org/wiki/Degree_%28angle%29 degrees], they use radians, which are a different way of saying how big an angle is | Change the "(0,0,0)" to how many [http://en.wikipedia.org/wiki/Radian radians] (not degrees) you want it to rotate. Instead of using [http://en.wikipedia.org/wiki/Degree_%28angle%29 degrees], they use radians, which are a different way of saying how big an angle is. | ||
Play around with it, you can put the new number in either one of the three zeroes in the line, like this: | Play around with it, you can put the new number in either one of the three zeroes in the line, like this: | ||
< | <syntaxhighlight lang="lua"> | ||
game.Workspace.slope.CFrame=CFrame. | s = game.Workspace.slope; s.CFrame = CFrame.Angles(math.rad(30), math.rad(45), 0) + s.CFrame.p | ||
</ | </syntaxhighlight> | ||
Which will make it rotate in all kinds of directions. | |||
Also, you can use | |||
<syntaxhighlight lang="lua"> | |||
s = game.Workspace.slope; s.CFrame = CFrame.fromAxisAngle(Vector3.new(0,0,1), math.pi/2) + s.CFrame.p | |||
</syntaxhighlight> | |||
* Change the <syntaxhighlight lang="lua">Vector3.new(0,0,1)</syntaxhighlight> to the line to rotate around. For example, if you want to rotate the brick around the z axis, use <syntaxhighlight lang="lua">Vector3.new(0,0,1)</syntaxhighlight>. If you want to rotate the brick around the y axis, use <syntaxhighlight lang="lua">Vector3.new(0,1,0)</syntaxhighlight>. If you want to rotate the brick around the x = z line, use <syntaxhighlight lang="lua">Vector3.new(1,0,1)</syntaxhighlight>. | |||
* Lastly, change math.pi/2 to the value in radians you wish to angle the brick by. This can be a constant, a variable, up to you. | |||
==Using a WedgePart== | |||
* In [[Studio|Roblox studio]], click Workspace. | |||
* Click Insert > Object > WedgePart | |||
* It's as simple as that. You now have a WedgePart that acts like a ramp. | |||
[[Image:WedgePart.jpg]] | |||
Also | == See Also == | ||
[[Radians]] | |||
[[Function Dump/Mathematical Functions]] | |||
[[Category:Building Tutorials]] | [[Category:Building Tutorials]] | ||
[[Category: | [[Category:Scripting Tutorials]] | ||
Latest revision as of 05:10, 27 April 2023
Template:LowQualityMedia Template:LacksMedia
Introduction
There are three ways you can make ramps. You can either use a Hinge or a CFrame to edit rotation, or you can simply insert a WedgePart
Using a Hinge
- In Roblox studio, click Workspace.
- Click Insert > Object > Part
- Resize the newly brick so that it is one unit wide, one unit long, and as tall as you want.
- Click the Weld option in your Toolbar (it has an X in a square).
- Click ONE side of your tall brick with the weld option.
- Click Workspace.
- Click Insert > Object > Part
- Resize this newly created brick so it is one unit wide, one unit long, and one unit tall.
- Click the Weld option in your Toolbar.
- Click the side of this brick that is facing the welded side of the TALL brick with the weld option. You should have two welded faces facing each other.
- Select the Drag option in your Toolbar.
- Place the small brick near the top of the tall tower.
- Select the Hinge option on your Toolbar
- Click the small brick. A yellow dot should be protruding from it.
- Click Workspace.
- Click Insert > Object > Part
- Resize this newly created brick to a long, flat, rectangle.
- Drag this newly created rectangle so that you can't see the yellow dot.
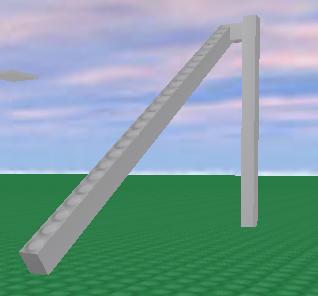
- Test your game. If you did this correctly, your bar should fall downwards.
Using a CFrame
Make a brick, anchor it and name it "slope". Then open the Command Bar and type this in:
s = game.Workspace.slope; s.CFrame = CFrame.Angles(0,0,0) + s.CFrame.p
Change the "(0,0,0)" to how many radians (not degrees) you want it to rotate. Instead of using degrees, they use radians, which are a different way of saying how big an angle is.
Play around with it, you can put the new number in either one of the three zeroes in the line, like this:
s = game.Workspace.slope; s.CFrame = CFrame.Angles(math.rad(30), math.rad(45), 0) + s.CFrame.p
Which will make it rotate in all kinds of directions.
Also, you can use
s = game.Workspace.slope; s.CFrame = CFrame.fromAxisAngle(Vector3.new(0,0,1), math.pi/2) + s.CFrame.p
- Change the to the line to rotate around. For example, if you want to rotate the brick around the z axis, use
Vector3.new(0,0,1)
. If you want to rotate the brick around the y axis, useVector3.new(0,0,1)
. If you want to rotate the brick around the x = z line, useVector3.new(0,1,0)
.Vector3.new(1,0,1)
- Lastly, change math.pi/2 to the value in radians you wish to angle the brick by. This can be a constant, a variable, up to you.
Using a WedgePart
- In Roblox studio, click Workspace.
- Click Insert > Object > WedgePart
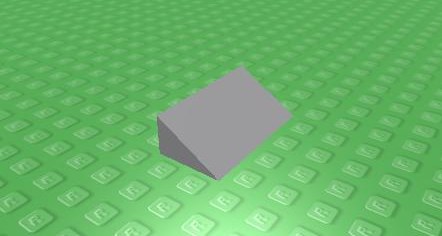
- It's as simple as that. You now have a WedgePart that acts like a ramp.

