User:Jopc67/How To Make Precipitation: Difference between revisions
>Jopc67 No edit summary |
>Jopc67 No edit summary |
||
| (3 intermediate revisions by the same user not shown) | |||
| Line 1: | Line 1: | ||
{{CatUp | Tutorials}} | |||
{{ScriptTutorial|Moderate|Lua Scripting}} | |||
{{LeftNoticeStart}} | |||
This will replace [[How_to_make_precipitation | How To Make Rain]] on the [[Tutorials | Tutorials]] page. I made this page fancy due to this is a EveryoneWillFindThis page. Feel free to edit. This is a moderate tutorial according to the old page and a Building and Scripting Tutorial. | |||
Post in the talk of this page of what you have done or what you would like to change if it's major or just feel free to talk there. | |||
|} | |||
__TOC__ | |||
{{EmphasisBox/start|blue}} | |||
=Intro= | |||
This tutorial is for creating rain. | |||
We’ll be using <i style="color:blue;">math.random</i>, <i style="color:blue;">a loop statement</i>, and <i style="color:blue;">building rain drop skills</i>. | |||
{{EmphasisBox/end}} | |||
{{EmphasisBox/start|blue}} | |||
=Before We Script= | |||
[[Image:Rain_Drop_Name.png|200px|thumb|right|The Name of the Rain Drop]] | |||
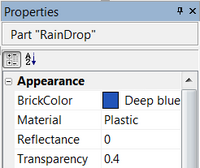
[[Image:Rain_Drop_Appearance.png|200px|thumb|right|The Color and Transparency of the Rain Drop]] | |||
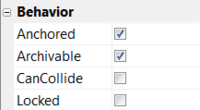
[[Image:Rain_Drop_Behavior.png|200px|thumb|right|Anchored True and CanCollide false for the Rain Drop]] | |||
[[Image:Rain_Drop_Shape.png|200px|thumb|right|The Shape and Size of the Rain Drop]] | |||
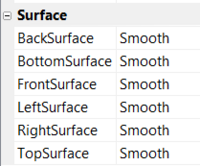
[[Image:Rain_Drop_Surface.png|200px|thumb|right|All Surfaces set to Smooth for the Rain Drop]] | |||
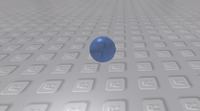
[[Image:Finished_Rain_Drop.png|200px|thumb|right|What the Rain Drop should look like.]] | |||
<!-- This is spaced like this to line up with the images. If you have a better way of doing it, then please do so. --> | |||
<div> | |||
We have to build the rain drop and insert the script in to the workspace. | |||
So first insert a [[Part | Part]] name it <i style="color:blue;">RainDrop</i>. | |||
Change the [[BrickColor | BrickColor]] to a <i style="color:blue;">bluish color</i>. (You really can change it to any color if you like.) | |||
Make the [[Transparency | Transparency]] to somewhere around <i style="color:blue;">0.4</i>. | |||
Also, make [[Anchored | Anchored]] <i style="color:blue;">true</i> and [[CanCollide | CanCollide]] <i style="color:blue;">false</i>. | |||
Next, change the [[Shape | Shape]] to <i style="color:blue;">Ball</i> and make the [[Size | Size]] <i style="color:blue;">1 by 1 by 1</i>. | |||
Lastly, make sure all the [[Surface | Surfaces]] are set to <i style="color:blue;">Smooth</i>. | |||
</div> | |||
{{EmphasisBox/end}} | |||
{{EmphasisBox/start|green}} | |||
=Scripting= | |||
Now let’s insert a [[Script | Script]] into the <i style="color:green;">Workspace</i> and open it. | |||
==Part 1: Before The Loop== | |||
Let’s define a cloned rain drop by adding <i style="color:green;">local drop = game.Workspace.RainDrop:clone()</i> to the first part of the script. | |||
We also want to get rid of the original rain drop, because we don’t need it anymore. We’ve already cloned it on the first line. We’ll add <i style="color:green;">game.Workspace.RainDrop.Anchored = false</i> to the script. | |||
The code we have so far should look like this: | |||
<pre> | |||
local drop = game.Workspace.RainDrop:clone() | |||
game.Workspace.RainDrop.Anchored = false | |||
</pre> | |||
==Part 2: The Loop Condition== | |||
Let’s use a while loop. To do this let’s add <i style="color:green;">while wait(.1) do</i> and end it. We added the <i style="color:green;">wait()</i> between the <i style="color:green;">while</i> and <i style="color:green;">do</i> so we don’t have to add a <i style="color:green;">wait()</i> inside the loop statement. | |||
So far we should have this: | |||
<pre> | |||
local drop = game.Workspace.RainDrop:clone() | |||
game.Workspace.RainDrop.Anchored = false | |||
while wait(.1) do | |||
end | |||
</pre> | |||
==Part 3: Inside The Loop== | |||
We’re going to clone the RainDrop once more. If we don’t, the RainDrop will only fall out of the sky once. So let’s add <i style="color:green;">local dropClone = drop:clone()</i>. | |||
Our next line will position the water drop in the sky by adding <i style="color:green;">dropClone.Position = Vector3.new(math.random(-100,100),100,math.random(-100,100))</i>. Here’s a breakdown of that line: | |||
{{TitledBox/start|heading=Breakdown|blue}} | |||
*We randomly placed a water drop on the x axis between -100 and 100. | |||
*We put the drop at 100 on the y axis. | |||
*We randomly placed a water drop on the z axis between -100 and 100. | |||
{{TitledBox/end}} | |||
The next line is adding the new drop in to the Workspace by adding <i style="color:green;">dropClone.Parent = game.Workspace</i>. | |||
Lastly, let’s make the drop fall from the sky by adding <i style="color:green;">dropClone.Anchored = false</i>. | |||
The finished code should look like this: | |||
<pre> | |||
local drop = game.Workspace.RainDrop:clone() | |||
game.Workspace.RainDrop.Anchored = false | |||
while wait(.1) do | |||
local dropClone = drop:clone() | |||
dropClone.Position = Vector3.new(math.random(-100,100),100,math.random(-100,100)) | |||
dropClone.Parent = game.Workspace | |||
dropClone.Anchored = false | |||
end | |||
</pre> | |||
{{EmphasisBox/end}} | |||
{{EmphasisBox/start|grey}} | |||
=What Else Can You Do= | |||
*Search free models for “clouds” or “storm clouds” and find some cool clouds. They add to the awesome effect of the rain falling from the sky. | |||
*You could also have a little fun with it and make them bombs. Insert a [[Script | Script]] into the rain drop that we created before and paste this code into it: | |||
<pre> | |||
function onTouch(hit) | |||
local p = Instance.new("Explosion") | |||
p.Parent = game.Workspace | |||
p.Position = script.Parent.Position | |||
p.BlastRadius = 5 | |||
p.BlastPressure = 1000 | |||
script.Parent:remove() | |||
wait(0.5) | |||
p:remove() | |||
end | |||
script.Parent.Touched:connect(onTouch) | |||
</pre> | |||
{{EmphasisBox/end}} | |||
<div style="float:right;">Find an Error? Report it to [[User:Jopc67 | Me]]</div> | |||
[[Category: Building Tutorials]] | |||
[[Category: Scripting Tutorials]] | |||
Latest revision as of 00:39, 30 August 2011
This is a Moderate, Lua Scripting related tutorial.
|
This will replace How To Make Rain on the Tutorials page. I made this page fancy due to this is a EveryoneWillFindThis page. Feel free to edit. This is a moderate tutorial according to the old page and a Building and Scripting Tutorial. Post in the talk of this page of what you have done or what you would like to change if it's major or just feel free to talk there. |
Intro
This tutorial is for creating rain.
We’ll be using math.random, a loop statement, and building rain drop skills.
Before We Script


We have to build the rain drop and insert the script in to the workspace.
So first insert a Part name it RainDrop.
Change the BrickColor to a bluish color. (You really can change it to any color if you like.)
Make the Transparency to somewhere around 0.4.
Also, make Anchored true and CanCollide false.
Next, change the Shape to Ball and make the Size 1 by 1 by 1.
Lastly, make sure all the Surfaces are set to Smooth.
Scripting
Now let’s insert a Script into the Workspace and open it.
Part 1: Before The Loop
Let’s define a cloned rain drop by adding local drop = game.Workspace.RainDrop:clone() to the first part of the script.
We also want to get rid of the original rain drop, because we don’t need it anymore. We’ve already cloned it on the first line. We’ll add game.Workspace.RainDrop.Anchored = false to the script.
The code we have so far should look like this:
local drop = game.Workspace.RainDrop:clone()
game.Workspace.RainDrop.Anchored = false
Part 2: The Loop Condition
Let’s use a while loop. To do this let’s add while wait(.1) do and end it. We added the wait() between the while and do so we don’t have to add a wait() inside the loop statement.
So far we should have this:
local drop = game.Workspace.RainDrop:clone()
game.Workspace.RainDrop.Anchored = false

while wait(.1) do

end
Part 3: Inside The Loop
We’re going to clone the RainDrop once more. If we don’t, the RainDrop will only fall out of the sky once. So let’s add local dropClone = drop:clone().
Our next line will position the water drop in the sky by adding dropClone.Position = Vector3.new(math.random(-100,100),100,math.random(-100,100)). Here’s a breakdown of that line:
- We randomly placed a water drop on the x axis between -100 and 100.
- We put the drop at 100 on the y axis.
- We randomly placed a water drop on the z axis between -100 and 100.
The next line is adding the new drop in to the Workspace by adding dropClone.Parent = game.Workspace.
Lastly, let’s make the drop fall from the sky by adding dropClone.Anchored = false.
The finished code should look like this:
local drop = game.Workspace.RainDrop:clone()
game.Workspace.RainDrop.Anchored = false

while wait(.1) do
	local dropClone = drop:clone()
	dropClone.Position = Vector3.new(math.random(-100,100),100,math.random(-100,100))
	dropClone.Parent = game.Workspace
	dropClone.Anchored = false
end
What Else Can You Do
- Search free models for “clouds” or “storm clouds” and find some cool clouds. They add to the awesome effect of the rain falling from the sky.
- You could also have a little fun with it and make them bombs. Insert a Script into the rain drop that we created before and paste this code into it:
function onTouch(hit)
local p = Instance.new("Explosion")
p.Parent = game.Workspace
p.Position = script.Parent.Position
p.BlastRadius = 5
p.BlastPressure = 1000
script.Parent:remove()
wait(0.5)
p:remove()
end

script.Parent.Touched:connect(onTouch)